Create Your Own Website: A Beginner’s Guide
Table of Contents
Learn how to build your website step-by-step, from choosing a domain to adding content. Easy & affordable!
Before you start, please read this, this will help you.
Is it like learning how to create a website?
This beginner’s guide will assist you make your website in an effortless step-by-step format.
It won’t take lengthy, and if you do this method, you’ll be able to save some money in the long run (additionally on that later).
Step 1: Select a domain name (.www)
Choosing a domain name is like picking a name for your website! It’s the web address people will type in to visit your site. Here are some tips for choosing a good one:
- Make it memorable and easy to spell. People should be able to remember it and type it in correctly without any trouble.
- Keep it relevant to your website content. This will help people understand what your website is about.
- Consider using keywords. This can help people find your website when they search for those terms online.
- Shorter is usually better. This makes it easier to remember and type.
- Check if it’s available. You can do this by using a domain name search tool.
Here are some examples of good domain names:
- For a personal website: yourname.com, [invalid URL removed], [invalid URL removed]
- **For a business website: **companyname.com, [invalid URL removed], [invalid URL removed]
Once you’ve chosen a domain name, you’ll need to register it. This usually costs a few dollars per year. There are many domain name registrars to choose from, so shop around for the best prices and features.
Step 2: Get a Home for Your Website (Web Hosting)

Imagine your website is like a house. You’ve picked out a great name (your domain name!), but now you need a place to build it. That’s where web hosting comes in. It’s like renting a plot of land to put your house on, and it keeps your website up and running 24/7 so people can visit anytime.
There are different types of web hosting, but for beginners, shared hosting is a good option. It’s like living in an apartment building – you share resources with other websites, which keeps it affordable. As your website grows, you can upgrade to a bigger plan later.
Here are some key things to remember about web hosting:
- It stores your website files: Think of these as the bricks and furniture of your house. The hosting company keeps them safe and accessible.
- It makes your website visible online: Just like having an address lets people find your house, your web host makes your website accessible on the internet.
- There are different options: Shared hosting is good for starters, but there are also VPS (virtual private server) and dedicated server options for websites with more traffic or complex needs.
Tips for choosing a web host:
- Look for a reputable company with good reviews.
- Compare prices and features to find one that fits your budget and needs.
- Make sure they offer 24/7 customer support in case you need help.
Don’t worry about getting the perfect web host right away. You can always switch later if needed. The important thing is to get started and build your website!
Step 3: Building Your Website with WordPress
Now that you have a domain name and a home for your website (web hosting), it’s time to bring it to life! In this step, we’ll use WordPress, a popular website builder that’s both powerful and beginner friendly.
Think of WordPress as a set of building blocks that lets you create different kinds of websites, from simple blogs to online stores. And the best part? It’s free to use!
Here’s how to get started with WordPress on your web hosting:
- Log in to your web hosting account: This is like entering your plot of land where you’ll build your website. Each web hosting provider has its login page, so refer to their instructions if you’re unsure.
- Find the WordPress installer: Look for something like “Applications” or “Website Builders” in your web hosting dashboard. Many providers offer “one-click” installs for WordPress, making it super easy to set up.
- Fill in the details: When you find the WordPress installer, you’ll be asked to provide some basic information, like your website title, username, and password. Think of these as the foundation and security code for your digital house.
- Let WordPress do its magic: Once you enter the details, the installer will take care of the rest, setting up WordPress on your website. This might take a few minutes, so grab a cup of tea and relax!
Tip: Remember, you can always change the website title, username, and password later if you want.
By following these steps, you’ll have a basic WordPress website up and running in no time! Don’t worry, there are many resources and tutorials available to help you customize and add features to your website as you explore further.
Step 4: Design Your Website (Theme Time!)

Now that your WordPress website is set up, it’s time to make it look amazing! Think of this step as picking out the perfect outfit for your online presence.
Here’s how to do it:
- Head to your WordPress dashboard: This is like your website’s control center. You can usually access it by going to yourdomain.com/wp-admin (replace “your domain” with your actual website address).
- Click on Appearance: This section lets you control how your website looks and feels.
- Explore the world of themes: Themes are like pre-designed outfits for your website. You can browse free themes directly within WordPress, or search online for even more options.
- Find a theme that fits your style: Consider what kind of vibe you want for your website. Clean and modern? Colorful and playful? There’s a theme out there for everyone!
- Install and activate your chosen theme: Once you find a theme you love, click “Install” and then “Activate” to bring it to life on your website.
- Don’t worry, it’s not permanent: If you don’t like the theme you chose, you can always switch to a different one later. It’s like trying on different clothes until you find the perfect fit!
Remember, there are tons of resources and tutorials available online to help you customize your theme and make your website truly your own. So have fun exploring and expressing your creativity!
Now that your website has a cool theme, it’s time to arrange the furniture (pages) and make it feel like home. Here’s how:
Step 5: Organize Your Website
- Think about the rooms: What kind of information do you want to share? Common “rooms” on websites include a homepage, about page, contact page, and pages for specific services, products, or blog posts.
- Brainstorm and list: Write down all the pages you think might be useful. Don’t worry about getting it perfect yet!
- Start with the essentials: Focus on the most important pages first, like your homepage, about page, and contact page. These are like the living room and kitchen of your website – everyone should be able to find them easily.
- Organize the rest: Once you have the essentials, decide where to put the other pages. Think about how they connect and how visitors might navigate through them. It’s like arranging furniture in a room – you want it to flow nicely.
- Make it easy to find: Add your important pages to your website’s menu, like the navigation bar at the top or bottom. This is like putting up signs, so visitors know where everything is.
- Don’t worry, it’s flexible: You can always add or remove pages later, just like rearranging furniture in your room. The important thing is to start with a structure that works for you and your visitors.
Remember, there’s no one-size-fits-all approach to website structure. The best way to find what works is to experiment and see what feels right for you and your audience. Have fun making your website a welcoming and informative space!
Adding Content to Your Pages:
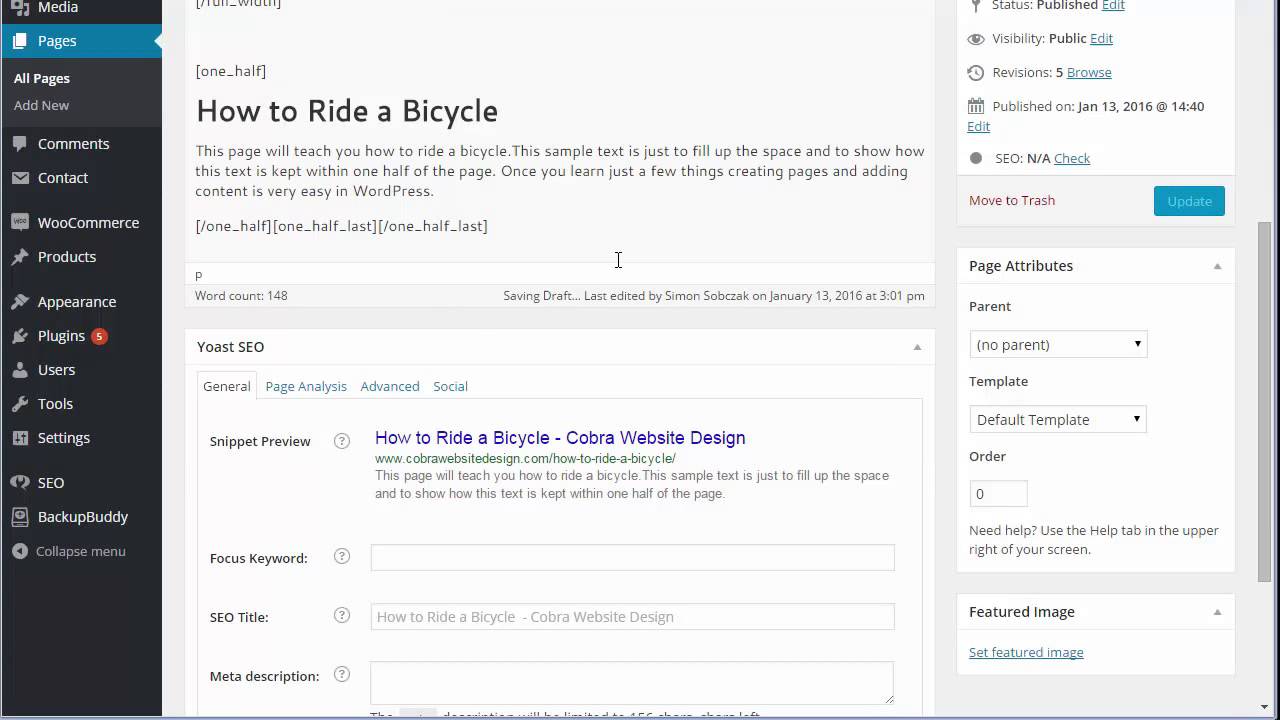
Once you have your page structure set up, it’s time to add content! Think of this as filling your rooms with furniture and decorations. WordPress makes it easy to add text, images, videos, and more using building blocks called “blocks.”
Here are some tips for adding content:
- Start with clear and concise writing. Make it easy for visitors to understand what you’re trying to say.
- Use images and videos to break up text and make your content more engaging.
- Proofread your content carefully before publishing.
Creating a Navigation Menu:
Your navigation menu is like a roadmap for your website, helping visitors find what they’re looking for. WordPress allows you to easily create and customize your menu.
Here are some tips for creating a navigation menu:
- Include only the most important pages. Don’t overwhelm visitors with too many choices.
- Use clear and concise labels for each menu item.
- Organize your menu items logically. Group related pages together.
Step 6 Adding a Logo and Favicon
A logo and favicon help brand your website and make it look more professional.
- A logo is a visual representation of your website. It should be simple, memorable, and reflect your website’s style.
- A favicon is a small icon that appears in the browser tab or address bar. It’s a good way to make your website stand out.
There are many free online tools and resources available to help you create a logo and favicon.
Your website is ready now!

Congratulations on building your website!
If you run into any issues or have questions, don’t hesitate to reach out for assistance. Consider connecting your website to Google Search Console. This free tool helps you understand how people find your site and what content resonates most. It’s like having a website report card! Setting it up is easy and takes about 10 minutes.
Remember, creating a website is an ongoing journey. Keep learning, experimenting, and adding content to make it even better!
For More Information Please Visit These Websites Craiyon And Arturia